Every legendary fashion designer from Coco Chanel to Alexander McQueen started exactly where you are right now: staring at a blank page, pencil in hand, wondering where to begin.
The good news? You don't need a natural gift for drawing. Fashion illustration is a learnable craft built on understanding proportion, movement, and line confidence all of which come with deliberate practice.
In this guide, we'll break down the art of fashion design sketches into clear, actionable steps. Whether you're developing your fashion illustration design style from scratch or looking to understand how to improve fashion design skills you've already started building, this is your foundation.
What Is Fashion Illustration and Why Does It Still Matter?
Before the age of digital design tools, fashion illustration was the only way a designer could communicate a vision. Today, even with 3D rendering software and AI-generated mockups, the hand-drawn sketch remains irreplaceable in one critical moment: the moment of pure ideation.
When you sketch by hand, your brain and your hand work in a loop that no software can replicate. Ideas emerge mid-stroke. A collar becomes a cape. A simple silhouette suggests an entire collection. This is why studying fashion illustration design is not a throwback, it is the core skill from which everything else in your career will grow.
"A fashion sketch is not just a drawing, it is a conversation between the designer's instinct and the world that hasn't seen the garment yet."
Understanding the Croquis: Your Fashion Figure Template
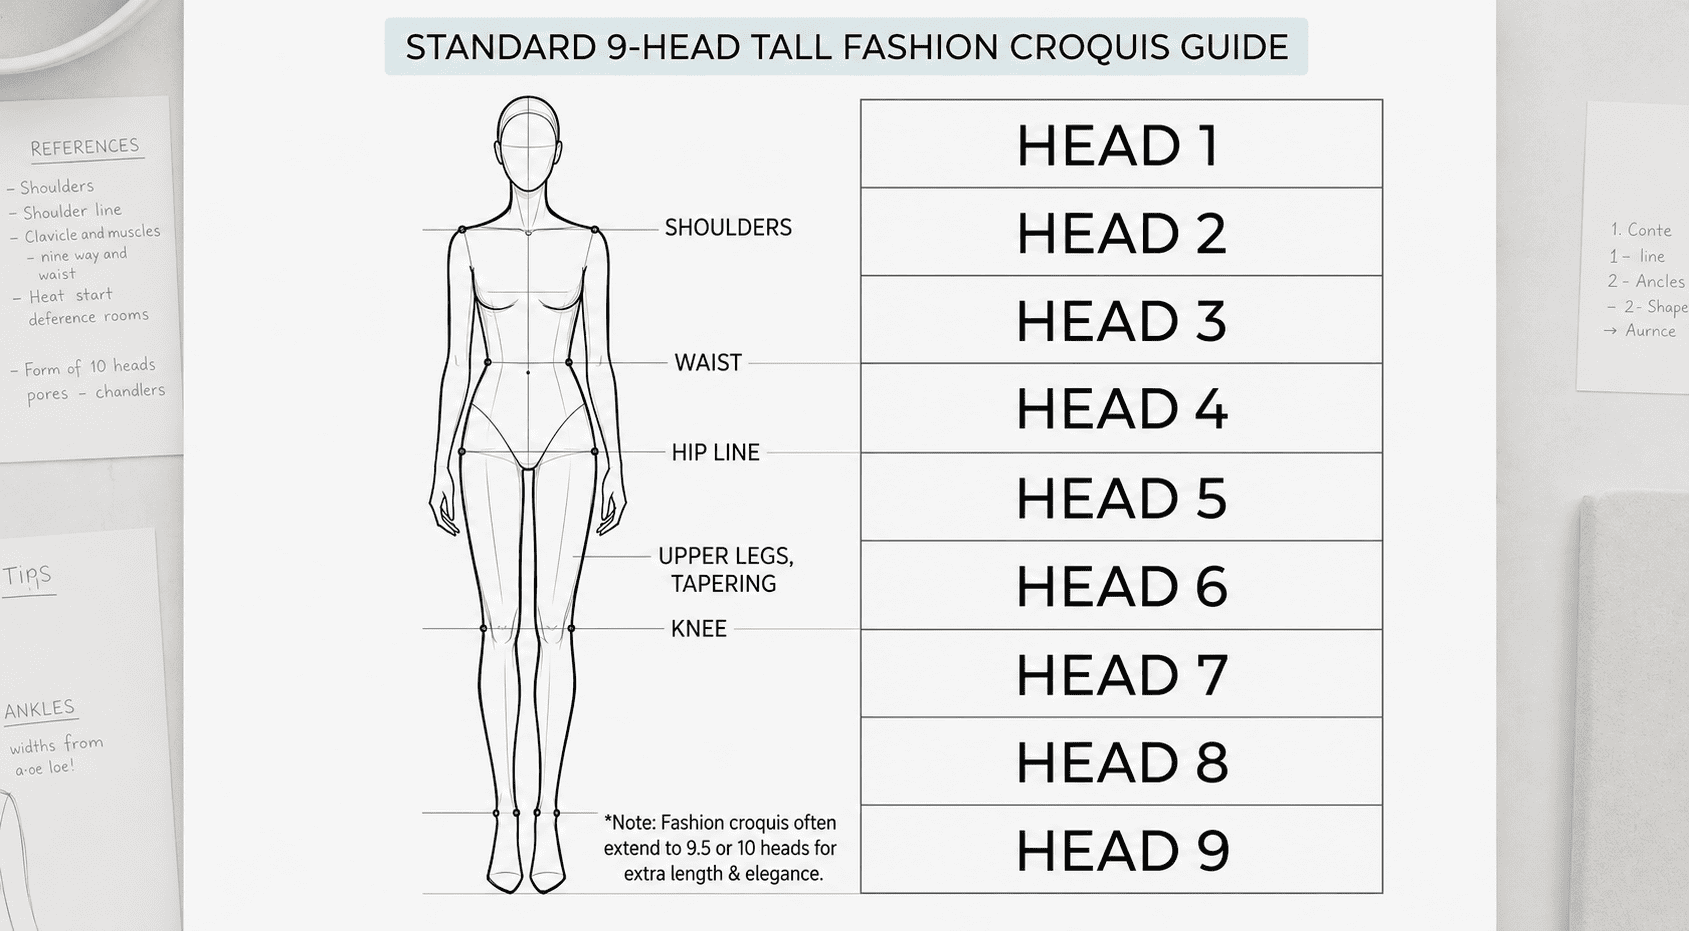
The word croquis (pronounced kroh-KEE) is French for "rough sketch." In fashion, it refers to the stylised human figure template that designers use as the base for all their garment drawings. Unlike a standard anatomical figure, the fashion croquis is deliberately elongated, typically 9 to 10 heads tall, compared to a realistic 7.5 heads to give clothes the dramatic, editorial quality you see in lookbooks and runway photography.
Learning to draw a consistent croquis is the single most important skill for producing clean fashion design sketches. Once you have a reliable figure, designing becomes much faster because your foundation is already there.
The nine sections of the croquis map out like this:
- Head 1: The head itself is your unit of measurement for everything below.
- Head 2: Ends at the shoulder line.
- Heads 3–4: The torso. The waist falls near the bottom of Head 4.
- Head 5: The hip line. This is the widest point of the lower body.
- Heads 6–7: The upper legs, tapering toward the knee.
- Head 8: The knee and upper shin.
- Heads 9–10: The lower leg, ankle, and foot. Fashion croquis often extend to 9.5 or 10 heads for extra length and elegance.
How to Draw a Fashion Croquis: Step-by-Step
Follow these steps every session. Repetition is the only teacher here aiming for at least three full figures per practice session.
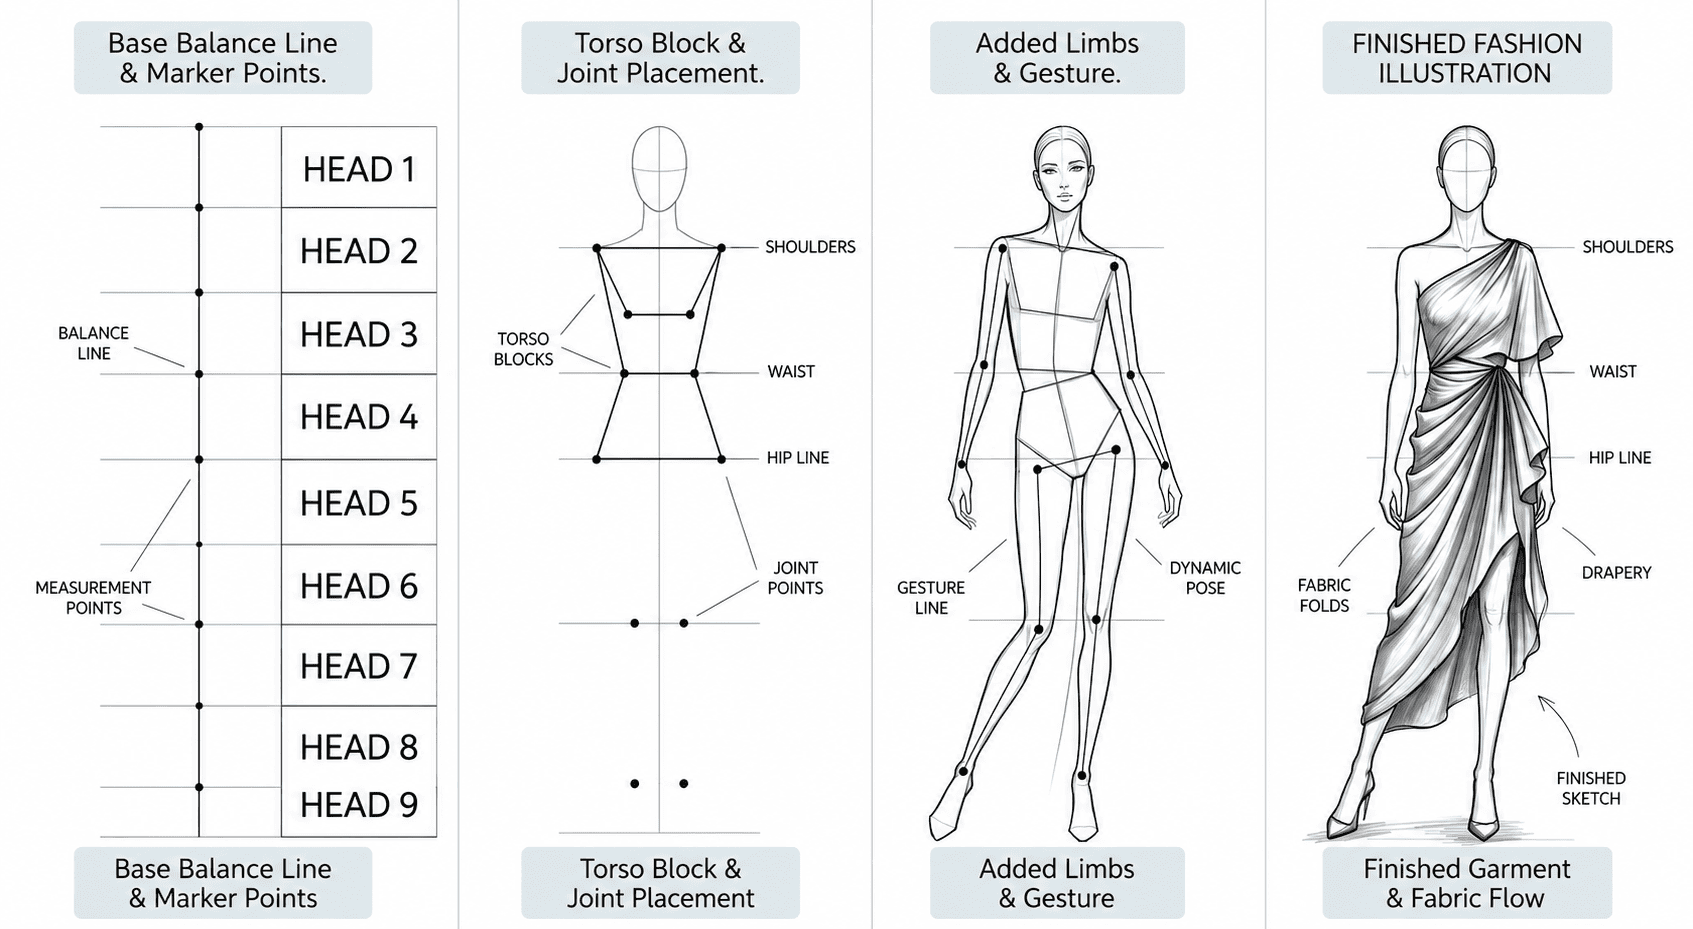
Step 1 : Draw the spine and balance line
Start with a single vertical line down the centre of your page. This is your balance line, the invisible axis the entire figure will orbit. Every fashion croquis should feel like it has gravity and poise, and this line is the foundation of both. Mark nine equal units along it lightly in pencil.
Step 2 : Place the head as your unit of measure
Draw an elongated oval at the top slightly narrower at the chin than the temples. This is Head 1, and every other proportion will be measured against it. Keep it simple at this stage; facial features come much later and are often just suggested, not detailed.
Step 3 : Map the shoulder, waist, and hip lines
Using your head-unit marks: shoulders sit roughly at the end of Head 2. The waist falls around Head 4. The hips land near Head 5. Draw gentle horizontal lines at each of these points slightly wider at the shoulder and hip, gently narrowed at the waist. Fashion figures have exaggerated proportions here: shoulders wide, waist cinched, hips balanced.
Step 4 : Sketch the torso using two triangles
Connect the shoulder endpoints down to the waist, then flare back out from the waist to the hips. Think of it as two triangles sharing a point at the waist. This is one of the most effective tricks for getting the torso silhouette right quickly; it captures the natural curve of the body without getting bogged down in muscle anatomy.
Step 5 : Add the legs long and deliberate
The fashion croquis derives much of its elegance from the legs. From the hip line, the legs run down to about Head 8 for the knee, and Head 9 to 10 for the ankle. Draw them with a slight S-curve rather than straight lines; this introduces natural movement. One leg often bears weight (the action leg), while the other has a relaxed bend.
Step 6 : Position the arms and hands
Arms hang from the shoulders and reach roughly to mid-thigh. The elbow falls at the waist level. Keep arms slightly away from the body a figure whose arms hang tight to the sides looks stiff, not fashionable. Hands in early sketches can be simplified to a small wedge-like shape; detail comes with experience.
Step 7 : Add gesture and attitude
This is the step beginners most often skip and it's the one that makes fashion design sketches feel alive. Tilt the hip line slightly. Let one shoulder drop. Turn the head a few degrees. Even subtle shifts in pose transform a stiff diagram into a figure that seems to be mid-stride on a runway. Study editorial photography and notice how rarely professional models stand perfectly symmetrical.
Step 8 : Lay the garment over the figure
Now the croquis becomes your canvas. Sketch your garment idea on top, following the body's natural curves and movement. Fabric doesn't fall like a stiff board; it drapes, gathers, and responds to gravity and motion. Indicate this through gentle curved lines rather than straight edges. At this stage, line weight matters: heavier lines for garment edges, lighter lines for interior fabric detail.
Mistakes Every Beginner Makes and How to Avoid Them
Drawing the head too large.
The fashion croquis head is deliberately small. If your figure looks "normal," the head is probably too big to scale it down.
Starting with the details.
Beginners often jump straight to buttons, pockets, or collar shapes. Always build from the overall silhouette inward. The silhouette is what registers first in fashion.
Pressing too hard in early stages.
Use a light touch in the construction phase. Heavy early marks are hard to refine. Press firmly only when you are sure of a line.
Ignoring the legs.
Because garments often cover the legs, students neglect them. A poorly drawn lower half undermines the entire figure's credibility. Practice legs in isolation.
Using only one pose.
Learning a single pose and repeating it endlessly is a trap. Different designs demand different poses. A flowing evening gown needs a different stance than a structured blazer.
Communicating Fabric Through Line
One of the most overlooked aspects of fashion illustration design is the ability to suggest fabric texture through line quality alone without colour, without shading, just marks on paper.
Silk and satin are drawn with long, flowing, confident curves. The lines should feel fluid and uninterrupted any hesitation in the stroke will read as a crease or stiffness that silk doesn't have.
Denim and structured cotton use shorter, more angular lines. Seams are pronounced. The garment doesn't flow around the body the same way it sits on it. Your lines should reflect this resistance.
Knit and jersey require lines that hug the body closely and then stretch and gather at joints. Think of how a fitted t-shirt behaves at the armpit or elbow indicating these tension points in your drawing.
Tulle and organza are best suggested through layered, almost cloud-like marks, with visible transparency indicated by showing body lines through the fabric layers.

Practice sketching swatches before applying fabric marks to a full figure. A small 3×3cm study of how silk drapes is worth more than a dozen full-body illustrations drawn without understanding the material.
"The line that describes a cashmere drape is nothing like the line that describes a leather seam. Learning to see these differences is what separates a technical sketch from a fashion illustration."
How to Improve Fashion Design Skills: A Structured Practice Routine
Talent is irrelevant. Consistency is everything. Here's a weekly practice structure that will produce measurable improvement in your fashion design sketches within 30 days.
Monday Croquis repetition
Draw five blank croquis from memory. No garments, no details, just the figure. Focus on proportion and gesture. Time yourself: aim for a clean croquis in under 8 minutes by the end of the month.
Wednesday Garment study
Pick one garment from your own wardrobe or from a fashion magazine. Lay it flat or study it on a hanger, then sketch it in detail. Notice construction lines, seam placement, and how fabric folds at structural points like the armhole or waistband.
Friday Full design illustration
Combine your croquis and garment knowledge into one original design concept. This is the creative session sketch freely, don't edit yourself. Do at least three variations of the same concept before moving on. Variety forces design thinking.
Sunday Reference analysis
Spend 30 minutes studying published fashion illustrations from Rene Gruau, Antonio Lopez, or contemporary illustrators whose work you admire. Don't copy; analyse. Ask yourself: where is the line heaviest? What does the illustrator choose to leave out? What exaggerations define their style?
Tracking your progress matters. Date every page of your sketchbook. Looking back at week-one sketches versus week-four sketches is one of the most motivating things you can do and it gives you concrete evidence of the improvement you might otherwise not notice in the day-to-day.
To fast-track your weekly practice structure and turn rough sketching habits into studio-grade outputs, explore the core structured Fashion Design Course syllabus which guides beginners through formal design processes.
The Only Tools You Actually Need to Start
Fashion illustration has a culture of expensive supplies. Ignore it. Here is what genuinely matters for a beginner:
An HB and a 2H pencil.
The 2H for light construction lines, the HB for confident final strokes. Nothing more.
A smooth cartridge paper sketchbook, A4 or A3.
Avoid heavily textured watercolour paper at this stage it fights your pencil and makes clean lines harder.
A fine-tip black marker.
Once your pencil sketch is clean, inking over the key lines with a 0.3 or 0.5mm marker teaches you to commit to line decisions, a skill that directly transfers to drawing with more confidence.
Coloured pencils or Copic markers optional.
Colour is an advanced layer. Get your line work right first. Colouring a poorly drawn figure only highlights the structural problems; it doesn't conceal them.
Avoid digital tools entirely in your first month.
The resistance of pencil on paper the way you can't undo, the way your hand pressure shows trains your eye and hand in ways that a stylus and a screen simply do not.
From Technique to Signature: Finding Your Illustration Style
Technique is what you learn. Style is what you cannot help doing. It develops by itself as you accumulate hours in the way you naturally elongate certain lines, the poses you're drawn to, the amount of detail you gravitate toward.
The biggest mistake developing illustrators make is trying to engineer their style too early. They decide they want to illustrate "like" a particular artist and spend months mimicking that artist's work instead of doing their own. The result is always technically competent and creatively hollow.
What you can do and should do is deliberately widen your visual vocabulary. Study art history. Look at Art Nouveau's flowing organicism, Bauhaus's clean geometry, the exaggerated graphic quality of Pop Art. Fashion has borrowed from all of these movements, and understanding them gives you a richer toolkit to draw from unconsciously as your style develops.
Keep every sketch. Your "bad" sketches are data. They show you exactly where your instincts are still underdeveloped. The figure that always goes wrong at the hip, the shoulder that's always too narrow, these patterns reveal themselves over time, and you cannot see them unless you keep the evidence.
The Honest Truth About Self-Teaching
There is a ceiling to what you can achieve by practising alone, a ceiling formed by the feedback loops you don't have access to, the industry conventions you haven't been taught, and the portfolio structure that professional recruiters and brands actually expect.
A sketchbook full of improving figures is a genuine achievement. But a portfolio that opens doors in the fashion industry is something different: it has curation, direction, context, and the fingerprint of someone who understands not just how to draw, but what the industry is looking for and why.
Self-teaching can only take your sketches so far. If you want to turn these illustrations into a professional portfolio, explore our fashion designing course in Ahmedabad where guided instruction, industry mentorship, and peer critique accelerate what solo practice simply cannot.
A sketchbook full of improving figures is a genuine achievement. But if you want to scale the ceiling of solo practice and convert your style into a certified career, explore the Fashion Design Courses in Ahmedabad at Amor Design Institute. Benefit from international credentials via our collaboration with IMB Milan, hands-on portfolio mentoring, and 100% industry placement assistance to launch your professional brand.